Facebook Instagram Twitter youtube
  • Sunt Petra
    • Bucătăria mea
    • Ce îmi dă strălucire-n ochi?
    • Ingrediente preferate
    • Gânduri despre hrană
    • *Trucuri
    • Pe unde-n lume am mâncat bunătăţuri?
  • Reţete vechi
    • Băuturi & compoturi
    • Delicate
    • De Sărbători
    • Deserturi prăjite
    • Din copilărie
    • ♥ gheghe & gemuri
    • Gustări
    • Plăcinte & Tarte
    • Prăjituri
    • Sufleuri
    • Supe vege
    • Torturi
  • Şi noi
    • Adunate
    • Biscuim
    • Ciocolove
    • De consolare
    • Detoxifiere
    • Detoxifiere cu unt
    • Din jurul lumii
    • Fără coacere
    • Ingrediente de casă
    • La MD, fără zahăr
    • Pisici 🐾
    • Pizza
    • Prăji bune
    • Sărat vege
    • ♥ sorbet
    • Tipuri de pâine
    • Vegane
  • Colaborăm?
    • Pot contribui cu…
    • Eu mai şi scriu
    • Unde-mi puteţi cumpăra bunătăţurile?
  • I'm Petra
    • My kitchen
    • What makes me sparkle?
    • Favourite ingredients
    • Thoughts about food
    • *Tricks
    • Inspiration from the World
  • Old Recipes
    • Airy
    • Birthday cakes
    • Cakes
    • Childhood memories
    • Drinks & Compotes
    • Fried desserts
    • ♥ Gelato & preserves
    • Holiday Time
    • Pies & Tarts
    • Plant-based soups
    • Snacks + Treats
    • Soufflés
  • New Ones
    • Breakfasty, no sugar
    • Cats 🐾
    • Chocolatey
    • Comfort food
    • Cookie time
    • Detox
    • Detox with butter
    • DIY ingredients
    • From the world
    • No-bake desserts
    • Pizza
    • Savoury vegetarian
    • ♥ Sorbetto
    • Travel-inspired
    • Types of bread
    • Veganesque
    • Yum cakes
  • Join me?
    • I can help you with…
    • I also write
    • Where can you buy my bakes?

Petra's Rolling Pin

Lobiani

Yesterday (December 17th) was St Barbara, a very important celebration in Georgia. Lobiani is the staple dish.

What is lobiani? It is a pie filled with beans. 🫘(I loved it when I tried it in Tbilisi.)
Marcel had the idea to make our version at home, so here's the recipe—


For the dough (makes 2):

80ml water

2g fresh yeast

1 teaspoon of sugar

125g flour

2g salt


Let the yeast and the sugar sit in the water for 5 minutes. Add the flour and the salt. Knead. Let the dough rise for 1 hour.


For the filling (makes 2):

250g boiled beans

4 garlic cloves

salt

Mash the beans and garlic cloves. Add the salt.


Method:

Split the dough in two equal parts. Roll each half out. Spread the beans and garlic mixture over each of them. Make a crescent moon by sticking the ends of the dough. Bake in a pan on low heat until brown. Munch.


It was delicious and filling!

04:22 No comments

Orach pie

• Spring version

Dough:

200g flour

5g fresh yeast

100ml buttermilk

salt

Filling:

2 orach bunches

salt

butter

1 green garlic


+1 small egg


Variant: Add ewe cheese on top of the filling if you wish.


• Fall version

Dough:

240g flour

5g fresh yeast

160g sour cream

salt

Filling:

300g orach

salt

butter

1 pestled garlic clove


+2 tbsp of milk


Baking pan: 20x20 cm


Orach was the ingredient of this year for me! I fell in love! I felt lucky to be able to bake this orach pie in spring and fall!

The recipes are almost similar. To make the dough, mix the yeast with the buttermilk or the sour cream, adding the required amount of flour. You’ll get a non-sticky dough, slightly hard. Let it rise for 1 hour. 

Then (a kind man named Marcel helped me), wash the orach leaves. Be careful, that pink liquid stains (I used red orach). Let the orach leaves simmer in butter; add the salt, the green garlic or the garlic clove, depending on the season.

The orach leaves

Roll out half of the dough in a buttered and floured baking pan. Add the filling and the ewe cheese if you wish. Then, add the other half of the rolled-out dough and stick the two pieces together.

Setting up the orach pie

Brush the egg or milk on top of the pie, then bake it in the preheated oven at 180°C for 20 minutes. 


It keeps well, even under high temperatures and for several days. We had it with us as breakfast in Greece. It was such a joy!
18:05 No comments

Vegan spelt pizza with Vegmezan from NoMoMoo

You may wonder what Vegmezan is. If you click this link and then this one, you will understand that I wanted to come up with a savoury recipe from the vegan goodies wholeheartedly made by NoMoMoo*!

Well, Vegmezan is a cashew parmesan.

I used white spelt (whole spelt is trickier to use for bakes; with white spelt, you’ll get a fluffier dough) because I felt they’d complement each other!


Which were all the ingredients?

Well, I used—

250g white spelt flour

5g yeast

3g sea salt

1 tbsp of olive oil

160ml water


+olive oil

+white spelt flour


+(optional) 4-5 tbsp of tomato juice

+1 large tomato

+1 pc Vegmezan


My method?

Add the first 5 ingredients into a bowl in the specified order. Start kneading. When the dough feels compact and not sticky, let it sit for 1 hour.

Vegan spelt pizza dough

Brush olive oil on a pizza baking pan, flour it, and spread the dough.

If you wish, pour homemade tomato juice (with basil) onto the dough; it is optional.

Place the tomato slices onto the pizza dough, then bake for 10 minutes at 220°C.

Sprinkle Vegmezan over the pizza after removing it from the oven.

Vegan pizza with Vegmezan from NoMoMoo


My Dad was visiting; he was thrilled. He confessed that he didn’t even notice that the pizza was vegan.


*I’ll return in October with new vegan recipes that include other NoMoMoo goodies. Until then, already-tested but unpublished recipes will keep you company, along with the new recipes discovered throughout the detox that we’re undergoing again.

23:48 No comments

Buttery snacks
 

Makes 35-40


I used to bake these snacks pretty often (Marcel was a big fan). Then, I stopped. On New Year’s Eve, I baked them again. Several weeks later, I baked them again.

They’re lovely!

We will use this recipe for the dough. Consequently, you’ll need—


250g flour (+100g flour depending on the type of flour used)

10g fresh yeast or 5g dry yeast

250 ml water

some sugar

some salt


+1 l water & 2 tbsp of baking soda

+15g butter & salt


We will make the dough based on the above recipe. After it rises, cut the dough into 4 equal pieces. Shape each piece of dough into a cylinder. Cut each cylinder into 8-10 pieces, 2-3 cm in width.

Cut small pieces of dough from the cylinder-shaped dough

Meanwhile, pour the water into a deep pan, on low heat, and let the sodium bicarbonate dissolve. When the water starts boiling, take the small pieces of dough (3-4 at a time) and put them into the water. Turn them on the opposite side after they rise (for no more than 30 seconds on each side).

Let the small pieces of dough boil

Then, place them in a large baking pan, lined with baking parchment. Continue with the remaining pieces of dough. When you’re done, sprinkle some salt on the small pieces of dough and leave them in the preheated oven, at 250⁰C, for 10-12 minutes.

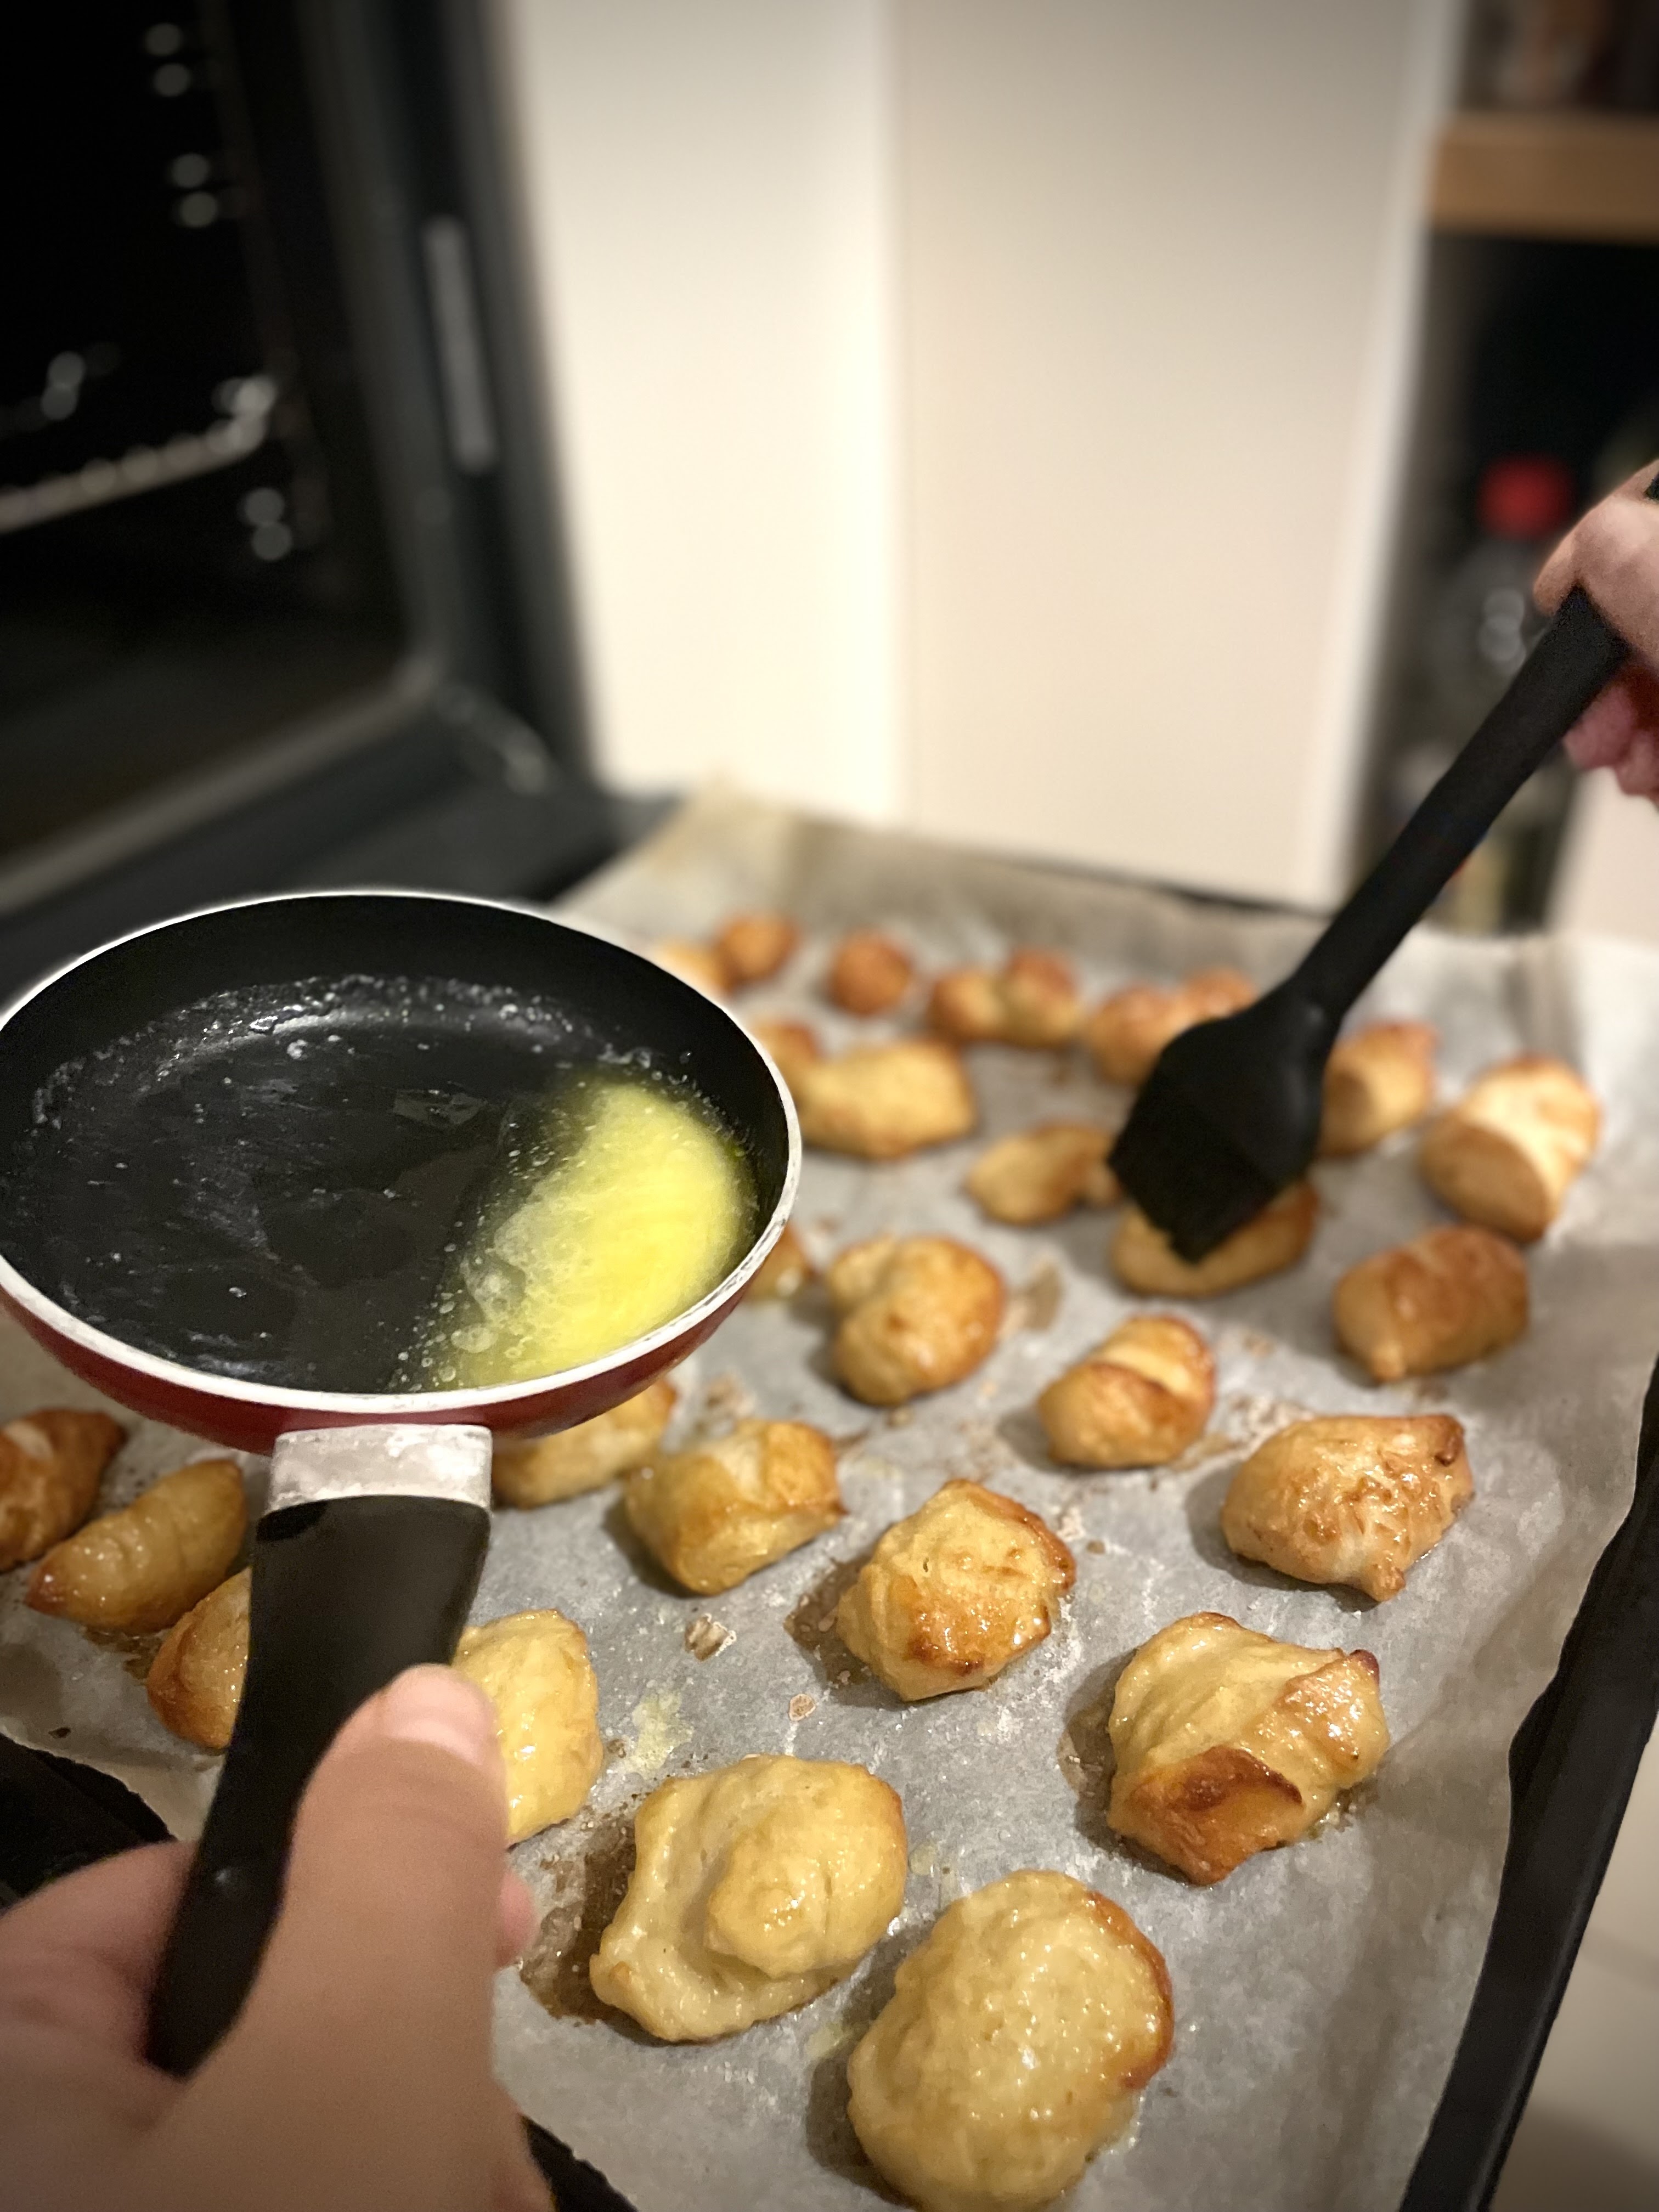
While they’re baking, melt the butter. After removing the baking pan from the oven, butter each snack using a pastry brush.

Butter each snack using a pastry brush

Let them cool and... start eating them. You won’t be able to stop anyway!

03:35 No comments

Poppy seed cozonac

Here is another cozonac recipe. The recipe of the dough is the same as in the case of the plain and walnut cozonac – and you can find it here. The only difference is the filling.


For 1 poppy seed cozonac you will need:

175g poppy seeds (ground)

70ml milk

40g sugar


Mix all the ingredients in a pan, on medium heat, and then spread half of the filling on each of the sheets. Work carefully and fast, the dough will become soggier.

Spread the poppy mix onto the cozonac sheets

The poppy seed cozonac is my favourite right after the plain one; it's the perfect reminder of the Easters I used to spend with my grandparents in Bod, year after year.

Happy Easter to all of you celebrating! ♥

14:12 No comments

Neapolitan pizza


Hmmm… until reaching Naples, two years ago, I had tasted Neapolitan pizza in Sicily and I had gotten hooked on it... but I had the best pizza of my life in Pozzuoli, 20 km away from the capital of Campania.

The simplicity and the freshness of the ingredients are, eventually, the elements that make a good pizza fantastic. I am a true classic in this respect!

I searched, I read, I adapted and this is how a Neapolitan pizza is made, without too-complicated kitchen devices and tools.


For 3 large pizzas, you will need:


420g flour

250ml water

1g fresh yeast

10g salt


+olive oil

+semolina

+tomato purée

+3 mozzarella balls

+fresh basil


To start, mix the water and 220g of flour for 2 minutes. Let the mixture sit for 30 minutes, at room temperature. This will be the base of our pizza.

The base of our pizza

Half an hour later, add the yeast and knead well, by slowly adding the remaining flour. When the flour is absorbed (in order not to deactivate the yeast), add the salt. Continue to knead. When the dough feels elastic and fine, place it in a plastic film and let it sit for 2 hours at room temperature.

Let the dough rise for 2 hours

When the dough rises, take it out on a mat and then divide it into three equal pieces. Like shown in the picture, roll the dough, stick its ends and cover with the dough edges. You will get three dough balls. Place them in the fridge, in bowls with lids. This way, the yeast will work slowly but the taste obtained will be fantastic.

Make the dough balls

After at least 5-6 hours in the fridge, take out the dough and bake the pizza (the dough balls keep for 3 days, so there’s no need to bake all of them on the first day... and you’ll notice that the last dough ball will taste best).

Pizza dough ball after sitting in the fridge

Oil the pizza pan, sprinkle semolina (this makes the dough fluffier). Add olive oil onto the dough and spread the dough over the pizza pan; then, pour tomato purée on top of it and bake in the preheated oven, at 220°C, for 4 minutes and a half.

Add olive oil and tomato puree on top of the pizza

Take the pizza out, place the mozzarella slices on it and bake for 3 minutes more.


When it’s done, sprinkle fresh basil leaves over it. Let it cool for a minute and cut yourself a slice.

How does it taste? J

02:46 No comments

Walnut cozonac

/makes 2/


40g fresh yeast

330ml milk

2 eggs

130g sugar

650g flour (+50g flour)

100g butter (melted)

a drop of vanilla extract

zest from 2 organic lemons


Walnut filling:

200g ground walnuts

40g sugar

20g cocoa

a few drops of rum essence

a few drops of milk (optional)


+1 egg


Because some of my girlfriends told me that they found it difficult to bake cozonac and that they failed at it, I told myself that an old family recipe would help them. Especially as Easter approaches. J


It is so easy to make and I guarantee its success.

In a bowl, pour warm milk over the fresh yeast and let it sit for 5 minutes.

Add the whole eggs and the sugar and stir well. Then, mix in the flour, the melted butter, the vanilla extract, and the lemon zest. Knead only a bit (for 2-3 minutes); it will be an easy process, anyway. The dough should be moist but not sticky. Add up to 50g of flour to reach optimal consistency. Cover the bowl and let the dough rise for 2 hours in a warm place.

Make the dough and let it rise

When the dough doubles, cover the bowl with a plastic film and let it sit in the fridge overnight. Remove the bowl from the fridge one hour before your start baking the cozonac.

Let the dough sit in the fridge overnight

Divide the dough into two equal pieces and each of these pieces – into two more. If you have two cozonac baking pans lined with baking parchment, the plain cozonac is very easy to make: roll the two mini-pieces of dough and then twist them and place the cozonac into the baking pan.

Plain cozonac

In the case of the walnut cozonac, mix the walnut, sugar, cocoa, rum essence, and milk (optional, to keep the filling together). Roll out each mini-piece of dough, spread half of the filling on each sheet and roll, sticking the ends together and the roll with egg. When you finish the second ‘roll’, twist them, place the cozonac in the baking pan and let it rise 10-15 minutes more.

Walnut cozonac - the making of

Then, brush each cozonac with egg and place the baking pans inside the preheated oven, at 160°C, for 40-45 minutes. After it cools, slice it and enjoy the fluffiness!

The cozonac out of the oven

Happy Easter! ♥

01:14 No comments

Mini-pretzels

Makes 45


50ml milk

1 tbsp/5g fresh yeast

1 teaspoon sugar

300g flour

1 teaspoon salt

100g butter

1 egg


+ 1 tbsp caraway seeds

+ 15-20g hard cheese (shredded)

+ 1 egg yolk


I have been planning to try out this recipe for a long time (it’s my godmother Maria’s) and I gladly recall the childhood holidays that had mini-pretzels on the table. I thought it would be nice to inspire you with this recipe for Easter.  


This is how you bake them... and I’m still craving them even though I’ve munched too many today.

Heat the milk (but only a bit in order not to deactivate the yeast); add the fresh yeast and the sugar. After 5 minutes, add the flour, the salt, the melted butter, and the egg and knead well. Let the dough rest for 1 hour.

The mini-pretzel dough after 1 hour

Divide the dough into two (it will be easier). Roll out the dough (thickness: 3-4mm), cut out mini-pretzels using a cutter, and place the mini-pretzels into a baking pan lined with parchment paper.  

Cut out the mini-pretzels

When you’re done (the dough will be harder to work with after the first roll-out, so press firmly on the cutter), brush the yolk on the mini-pretzels. I decided to make 15 plain mini-pretzels, 15 with caraway seeds (my favourites), and 15 with cheddar (but you can use any other hard cheese).

Brush the yolk on the mini-pretzels and sprinkle caraway seeds and cheese

Bake in the preheated oven at 180°C for 10-12 minutes (until the mini-pretzels turn brown).


I love the fact that these mini-pretzels are crunchy on the outside and soft on the inside. To keep them like that, store them in a dish with a lid.

00:55 No comments
Gogosi

Makes 32

10g fresh yeast
200ml water
50g sugar (+some sugar to sprinkle onto the water + yeast mix)
200g yoghurt
1 egg
450g flour (+flour to roll out the dough)
a pinch of salt
some orange zest

+oil for frying
+powdered sugar for serving
+preserves

I have been promising Marcel for a while now – ’We’ll have gogoşi tomorrow’... ’I’ll make gogoşi next week... really!’... and so on... But, as I like to keep my promises and I found my Mom’s old recipe, we did eat gogoşi! How to make them?

Leave the yeast in a glass with the warm water for 5-10 minutes and sprinkle a little bit of sugar.
Then, mix all the ingredients and start kneading. Be careful – only add 200g of flour at first and then the sugar, a pinch of salt, the orange zest, the yoghurt, break the egg, and also add the yeast mix from the glass. After kneading, your dough must not stick, but must not be too firm either. Let it rest in a warm spot, covering the bowl used with a lid or with a kitchen cloth. Sprinkle some flour on top.
One hour later, divide the dough into four pieces. Sprinkle flour onto the work surface and roll out the dough (1-1.5 cm thickness). Cut out circles (I used a cutter with a 5cm diameter and I got 8 such circles).
Roll out the dough and cut out circles
 
Fry them.
Dust them with sugar.
Munch.
I like them plain and with preserves. Mmmm...

It was the same on Sunday afternoons when my Mom used to spoil us with a huge plate of gogoşi.
None survived. J
15:53 No comments
Pizza dough in my wonderbowl

250g flour

5g fresh yeast

160 ml water

some sugar

some salt


To be honest, this is my Mom’s old pizza recipe – she used to bake it when I was a teenager. Don’t laugh – I started eating pasta and pizza only when I was 17. Well, in Romania, we were just starting to serve these dishes back then. Also, I thought I wouldn’t like them. Aaaah, with my Dad allergic to mushrooms (or so we thought), my parents avoided feeding me mushrooms, although my Grandpa used to go mushroom picking and did such a great job every time.
Even now, that taste of Romanian tomatoes combined with mushrooms on some fluffy dough seems unequalled – but I will talk to you about mixing these flavours some other time, it makes my mouth water right now and I still haven’t had my lunch. :-)
I adapted my Mom’s recipe – and I guess that this pizza dough is what I baked most. I could do it with eyes closed, just feeling the dough based on the flour used. With whole grain wheat, its texture is different and it takes more time to rise. 
You will also learn to differentiate between these textures; finally, here’s the recipe—

Remove the fresh yeast from the fridge a few minutes before working with it.
Add it to 160 ml of lukewarm water and sprinkle some sugar (it’s something that I learned from a friendly lady working in one of my neighbourhood’s stores; she's a good friend now). Let it sit for 10 minutes.
After adding 200g of flour into a bowl, pour the mix of water, sugar, and yeast into it and put in salt and sugar to taste (but not too much). Start kneading and adding as much flour as needed until the dough is no longer sticky and you can shape it into a ball.
Cover the bowl with a lid, a kitchen towel, or a paper towel and leave the dough to rise for one hour, in a warm spot.

From here on, you can use the dough. We will keep baking with it, you’ll see! J
18:46 No comments
Older Posts

Despre mine
About me


Mda. Cam asta-i relaţia mea cu dulciurile şi bucatele coapte: euforică. Eu sunt Petra.
Bat lumea în căutarea aventurii. Când revin pe plaiurile mioritice, coc – inspirată de tot ce îmi servesc paşii umblăreţi.
🧁
Yup! That's my relation with sweets and bakes: euphoric. Hi, I'm Petra!
I travel the world in search of adventures. When I get back home, I bake - inspired by all those travelly flavours and scents.

Primeşte reţetele pe e-mail :-)
Subscribe to my recipes :-)

Please try again. • Reîncearcă.
Let's bake! • Hai cu sucitorul!

Susţine-mă pe Patreon!
Support me on Patreon!

Susţine-mă pe Patreon! <br> Support me on Patreon!

Ce cauți?
What you're looking for?

S-ar putea să îţi mai placă...
You may also like...

  • Cartof
    Nu cred că cei din generaţia mea sau chiar şi din următoarele nu îşi amintesc de cartof cu nostalgie. Aşa că nu puteam să nu îl prepar. ...
  • Strawberry preserves
    This year, strawberries were a rarity! And they were delayed, if we even bought them in Turkey!   I barely managed to make a jar of strawber...
  • Cartof ● EN
    I believe that those in my generation or even the following remember cartof [potato, as it is shaped like one] with nostalgia. So, I coul...
  • Overnight dessert with oat flakes and raspberries
    I tried this recipe a while ago, and I’m eager to try it again. Summer will bring along the fresh raspberries. Until then, I’m using the r...
  • Desert peste noapte cu fulgi de ovăz şi zmeură
    Am încercat de mai mult timp această reţetă şi de abia aştept să o reîncerc. Va veni şi zmeura proaspătă la vară. Deocamdată, mă folosesc ...

Comunicarea cu animalele

Comunicarea cu animalele

Hai-hui prin lume
My RTW Travels

Hai-hui prin lume <br> My RTW Travels

Traducerile mele
My Translation Projects

Traducerile mele <br> My Translation Projects

Loc de cumpărături
Shop around

Urmăreşte-mă
Follow Me

Reclama ta aici.
Advertise here.

Hai să discutăm.
Let's talk about it.

Created with by ThemeXpose